Tuesday, March 30, 2010

Bib


I knit this cute little bib for my Grand baby that is to be born this Sept. The pattern came from Dishcloth Hangups for 2009. I used less then 1 skein of Sugar and Cream Stripes. The color is called Violet Stripes. Such a very pretty color for a baby bib!

Wednesday, March 24, 2010

Greg Iles The Devil's Pinchbowl

I just finished reading Greg Iles The Devil's Punchbowl, and I am exhausted. I truly hope that such evil does not exist in this world!!!
I need to read something fluffy now, something very, very fluffy. So that I can recover from this book. No Kidding

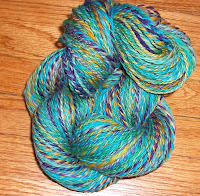
Magic Handspun Yarn


I named this yarn Magic because it spun up like magic. Just Beautifully. It is 172 yards of DK weight superwash Merino wool. This wool will not felt. I used professional dyes on this wool in the colors purple, turquoise, gold, and green.

Gauge is 5.5 stitches per inch
recommended needle size 5 - 7
14 WPI

Tuesday, March 23, 2010

On my wheel today


It was a very windy and sunny day yesterday. I decided to dye some Merino wool yesterday. Because I knew that it would dry fast out on the clothes line, and that I would be able to do a bit of spinning today. I used purple, turquoise, gold, and green. I am sooooo looking forward to getting the singles spun up. And then to watch the magic when I ply the singles together!

Sunday, March 21, 2010

Teddy Bear Baby Blanket


My Granddaughter and I tied a Teddy Bear Baby blanket for Jamie, and Sarath's baby today. We are looking forward to the new addition to our family this Fall.

Happy 30th Anniversary to Us


Celebrating 30 years of marriage today. My Granddaughter and I bakes a Big Cupcake for our Anniversary. Every year things get better and better. But the years seem to go Faster, and Faster!!!

Saturday, March 20, 2010

Baby Hat


I am expecting a new Grandchild next September. I don't know if I am getting a Grandson, or a Granddaughter. So I knit this little baby hat With less then 1 skein of Peaches & Creme worsted weight cotton. The color is called Lemon Lime. Perfect baby colors!! I used size 3 needles and cast on 60 stitches. I knit a 1 x1 ribbing for 1 inch. Then I knit 1 row of K1, K1b. Row 2 is K1b, K1. I knit row 1 and row 2 until the hat measured 4 inches from the beginning of the hat. Then I started my decreases. I knit 8, k2tog around the hat. The next row I just knit. The next decrease row I knit 7, k2tog. Then I knit a row. I continued decreasing every other row, until I had 6 stitches left. Then I threaded the yarn through the last remaining stitches. Pulled the top closed and weaved the ends in. So very simple. And a Great little hat for my Grandbaby.

Wednesday, March 17, 2010

Fingerless Mitts


MaryJane knit this pair of fingerless mitts, with my handspun Sweetie Pie yarn. They turned out great.
I just Love them MaryJane!

Monday, March 8, 2010

Norwegian Blessing

May da ruts always fit da wheels of your pickup.

May yur ear muffs always keep out the nort wind.

May da sun shine varm on yur lefse.

May da rain fall soft on your lutefisk.

And until ve meet again, may da good Lord protect
ya from any and all unnecessary uffdas.

Sunday, March 7, 2010

My Flea Market find


Matt and I took a bit of time out this morning, to go to the Flea Market. I found this amazing slipper at the flea market. It is in PERFECT condition. Not a chip in it any where. All of the fingers even have polish on them perfect. Not a chip in the polish or the fingers. The lace on the shoe is perfect! Just a lovely slipper. There is a sticker on the bottom of the slipper that says Japan. So I am assuming that it was made in Japan. This is a wonderful addition to my slipper collection.

Thursday, March 4, 2010

Blocking Folk Mittens

Either water or steam is used in the blocking process. Once your mitten is completed, the blocking is done. Blocking will help adjust, and reshape both the length and width of your mitten. Both of your mittens should be identical. Blocking will ensure proper size and fit of your mitten.

Your mitten can be dunked in cool water until completely saturated before shaping. Steam can also be used by pinning the mitten to the correct measurements, then using a steam iron held above the mitten to steam it into shape. Don't let the iron touch your mitten because the natural fibers can be scorched, and man made fibers will be ruined.
Which ever method you decide to use, it is important that the mitten should dry completely.

After blocking your mitten it should still have texture, and life. It should not be blocked to the point where the stitches are lifeless and flat.

Kitchener Stitch

I use the Kitchener Stitch to graft the lives stitches together in my Folk Mitten Patterns.
Using the Kitchener Stitch, you will be able to seam the live stitches together invisibly.
You need to make sure that the two pieces you are grafting together have the same number of stitches. Then you will
create a row of stitches with your sewing needle.
1) Draw your yarn through the very first stitch on the front needle as if to purl, and leave it on the needle.
2) Draw your yarn through the first stitch on the back needle as if to knit, and leave it on the needle.
These first 2 steps are only done once.
3) Pull the yarn through the first stitch on the front needle, as if to knit, and slip it off of the end of the needle.
4) Pull the yarn through the next stitch on the front needle as if to purl and leave the stitch on the needle.
5) Pull the yarn through the first stitch on the back needle as if to purl, and slip it off of the needle.
6) Pull the yarn through the second stitch on the back needle as if to knit, and leave this stitch on the needle.
Repeat rows 3 through 6 until you have all of your stitches grafted together. Then weave in your yarn ends on the inside of your mitten.
Just remember Knit, Purl, Purl, Knit while grafting the stitches on your mitten, and you will have a beautifully finished mitten.

Caring for your mittens

Caring for your mittens. Hand wash mittens in cool water with gentle wool wash. Do not rub or wring. Squeeze out excess water, then spin in washing machine or roll in towels to remove rest of water. Lay garment flat to dry out of direct sunlight and shape to original measurements.

Tips for knitting Fair Isle mittens

Fair Isle mittens are funtional as well as warm, and beautiful.

Try using wooden needles instead of metal. Wooden needles are less slipery, the wooden needles will grip your stitches better.

You can bind off Fair Isle mittens with a 3 needle bind off from the inside.

The easiest way to knit Fair Isle mittens is to use 4 needles, and devide your stitches evenly onto 4 needles.

Using 5 DPN's will help to avoid ladders.

When choosing colors for your mittens, make sure that there's enough contrast between the background colors and the pattern color so the pattern doesn't get lost.

Carry the strands of unused color loosely in the back of the project.

If you carry the yarn, that is not in use to tightly, you will have puckers.

Loose stitches can be tightened, but it is almost impossible to loosen stitches that are to tight, and they will cause puckering on the right side of your project, and may even affect the fit.

To help you keep your place on the chart, use a magnetic board or a piece of sticky note paper to mark the row you're working, This makes it easier to follow the chart. You can move it up as you finish each row. The reason for placing the marker above the row you are working on, is so that you can see how it fits with with what you have already knit.

You can also make a working copy of your chart and inlarge it, so you can make your own personal notes on the pattern, this will alo help you follow along better.

The key to organizing your yarn, is to keep one ball on your right side, and the other color on your left side. You should hold the main color in which ever hand you feel the most comfortable.

Putting your ball of yarn in a bowl, so that it can roll around in the bowl, may prevent twisting of your yarn.

I like to use a ribbed cuff on my mittens, because the rib is more snug, and very elastic. Your ribbing can be shortened or lengthened, to make the mitten perfect for you.

If your mitten does not fit perfectly, washing and blocking the mitten can change the size. I always block my wool Folk mittens.

Felted wool is warmer, and more water repellent.

Monday, March 1, 2010

Eyelet Shawl


My shawl is finished and I just LOVE it. I am soooo looking forward to a nice Sunny Spring day when I can wear my shawl out, and show it off. I hand dyed and handspun the yarn for this shawl. I love how this pattern shows off the colorway and texture of my yarn. The pattern for this shawl can be found here.